Блендеры VITEK VT-3406 W - инструкция пользователя по применению, эксплуатации и установке на русском языке. Мы надеемся, она поможет вам решить возникшие у вас вопросы при эксплуатации техники.
Если остались вопросы, задайте их в комментариях после инструкции.
"Загружаем инструкцию", означает, что нужно подождать пока файл загрузится и можно будет его читать онлайн. Некоторые инструкции очень большие и время их появления зависит от вашей скорости интернета.


5
ENGLISH
the mark
. Turn the gear (6) clockwise till
bumping. The mark
▼
should match the mark
in fixed position.
– Insert the power plug into the mains socket.
– Immerse the whisk (7) into the bowl with food.
– To switch the unit on, press and hold the «I»
button (3). Use this operation mode for mix-
ing liquid products.
– If you press and hold the «II» button (4), the
unit will operate at maximum rotation speed.
– After you finish using the unit, take the power
plug out of the mains socket, disconnect the
whisk (7) from the gear (6). Remove the gear
(6) from the motor unit (2) turning it so that the
mark
▼
is opposite the mark
.
Attention!
•
Do not use the whisk (7) to make tight dough.
•
Food should be put into the bowl before the unit
is switched on.
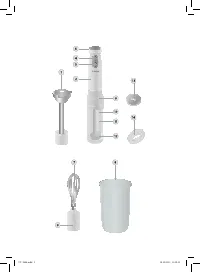
USING THE COOKIE AT TACHMENT
WARNING: Before assembling, make sure
that the power plug is not inserted into the
mains socket.
– Set the gear (9) on the motor unit (2). To do
this match the marks
▼
and
, then turn the
gear clockwise so that the marks
▼
and
are opposite to each other.
– Install the plunger (12) on the axis (11).
– Install the cutter (13) inside the clamp (14).
– Install the flask (10) into the clamp (14) with
unmarked side. Then turn the clamp in the
direction of the mark
.
– Pour the dough into the flask (10). The dough
level should not exceed the «MAX» mark. If
you filled the flask till the maximal mark, make
sure that the plunger (12) is installed as close
to the end of the axis (11) as possible.
– Immerse the axis (11) end without the plunger
into the flask (10) with dough; make sure that
the ledges on the flask match the grooves on
the plunger (12).
– Install the flask (10) on the gear (9) so that
the axis (11) is inserted into the gear opening.
Press on the axis till the clamp clicking. The
mark
on the flask should be opposite the
mark
▼
on the gear. Turn the flask clockwise
so that the marks
▼
and
match.
– Insert the power plug into the mains socket.
– Select the rotation speed with the buttons (3)
«I» or (4) «II».
Note: If the flask is empty and the plunger is
close to the cookie cutter, the axis motion
is blocked; the motor overload protection
system is switched on and the gear is
clicking. It is normal. Switch the unit off,
unplug it, set the plunger to the starting
position and add a new portion of dough
into the cookie attachment.
Basic dough recipe
200 g flour
130 g butter
100 g powdered sugar
1 egg
– Cut the butter into small cubes, put it in the
bowl and leave at room temperature till melt-
ing.
– Add powdered sugar and whip carefully with
the whisk.
– Whip the egg with a fork in a separate bowl.
– Gradually add the egg to the butter mixture,
continue whipping the mixture with the whisk.
– Sift out flour, add it to the butter mixture. Stir
the dough thoroughly with a spatula.
– Bake cookies at 190 °C during 10-12 minutes.
Cleaning
– Unplug the unit before cleaning.
– Remove the attachments.
– Use a slightly damp cloth to clean the motor
unit (2) and the gears (6, 9), then wipe them
dry.
– After processing of salty and sour products it
is necessary to rinse the blender attachment
(1) with water immediately.
– While possessing products with strong dye-
ing properties (for instance, carrot or beet-
root), the attachments and the bowls can get
colored, wipe them with a cloth dampened in
vegetable oil.
– Wash all removable parts in warm soapy
water, rinse and dry them.
DO NOT IMMERSE THE MOTOR UNIT (2) AND
THE GEARS (6, 9) INTO ANY LIQUIDS, DO
NOT WASH THEM UNDER WATER JET OR IN
A DISHWASHING MACHINE.
VT-3406.indd 5
10.12.2013 12:15:23


