Блендеры Saturn ST-FP9089 - инструкция пользователя по применению, эксплуатации и установке на русском языке. Мы надеемся, она поможет вам решить возникшие у вас вопросы при эксплуатации техники.
Если остались вопросы, задайте их в комментариях после инструкции.
"Загружаем инструкцию", означает, что нужно подождать пока файл загрузится и можно будет его читать онлайн. Некоторые инструкции очень большие и время их появления зависит от вашей скорости интернета.


4
WIRING INSTRUCTIONS
Appliance with fitted plug
Important
: For your convenience this appliance is supplied complete with a plug,
incorporating a 3 amp fuse.
In the event of replacing a fuse in the plug supplied, a 3 amp fuse approved by ASTA to
Bs1362 must be used.
If the socket outlets in your home are not a 13А, Bs1363 type and therefore do not accept
the plug connected to this appliance, cut off the plug.
When cut off, this plug is a shock hazard, if inserted into a socket outlet. It must
therefore be disposed of safely.
Fit the appropriate plug as instructed below. With alternative plugs, a 5 amp fuse must be
fitted either in the plug or adaptor or at the main fuse box.
Appliance without fitted plug
Fitting the plug.
Important:
The wires in the mains lead are colored in accordance with the following
code:
BLUE: Neutral / BROWN: Live
But the colors above may not correspond with the colored marking, identifying the
terminals in your plug, please proceed as follows. The wire, which is colored BLUE,
must be connected to the terminal, which is marked with the letter <N> or colored
black. The wire, which is colored BROWN, must be connected to the terminal, which is
marked with the letter <L> or colored red. This appliance is manufactured to conform to
Low Voltage Electrical Equipment (safety) Regulations 1989 and is designed to comply
with Bs3456. It complies with the requirements of the EEC Directive (89/336/EEC).
Any error in connecting the appliance invalidates the guarantee. Neither wire must be
connected to the earth terminal of three-pin plug.
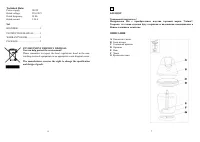
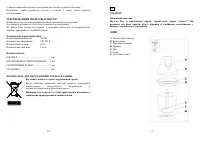
HOW TO ASSEMBLE AND USE THE CHOPPER
Fit the blade onto the blade support in the bowl and pour in the food to be chopped.
Lock the lid onto the bowl (fig. 1) and place your motor unit on the lid/bowl assembly,
twisting its lightly, so that the spindle fits into position in the motor unit. Plug the
appliance in. Press down on the motor unit and at the same time pres the ON button to
chop the food. Unplug the appliance and wait until the blade stops. Remove the motor
unit, the lid and the blade. Press lightly on the button to obtain speed 1 (minimum) and
firmly for speed 2.
Food
Maximum
quantity
Maximum
time
Recommended
speed
Parsley
30g
10 sees
l or 2
Onions
200g
Pulse
1
Shallots
200g
action
1
Garlic
150g
5 sees
1
5
Breadcrumbs
20g
15 sees
1 or 2
Almonds
100g
15 sees
2
Hazelnuts
100g
15s ec s
2
Walnuts
100g
15 sees
2
Gruyere
100g
15 sees
2
Boiled eggs
200g
10 sees
2
Ham
200g
15 sees
2
Steak
150-200g
15 sees
2
Light batter
0.4L
15 sees
1 or 2
Soup
0.4L
30 sees
2
Spice/Pepper
0.2L
see recipe
2
How to prepare a perfectly smooth consistency mayonnaise
Ingredients:
2 egg yolks
1 tbsp mustard
2tbsp water
1 tbsp vinegar
200ml oil
Salt
Pepper.
Place all the ingredients in the bowl, with 2 tbsp of the oil. Premix it by using a pulse
action. Add the remaining oil. Operate the chopper for 30 seconds on speed 2. It is
important, that all the ingredients are the same temperature.
IMPORTANT ADVICE
Do not use the chopper when it is empty.
A new blade will give you first class results from your appliance.
Allow the appliance to cool down for 2 minutes after each use.
SAFETY ADVICE
Please follow the instructions below carefully:
Unplug the appliance after each use.
Do not put the motor unit under a tap or in a dish-washer, but clean it with a damp
sponge.

