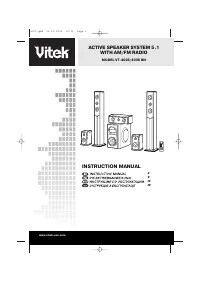
Акустика VITEK VT-4026-4036 - инструкция пользователя по применению, эксплуатации и установке на русском языке. Мы надеемся, она поможет вам решить возникшие у вас вопросы при эксплуатации техники.
Если остались вопросы, задайте их в комментариях после инструкции.
"Загружаем инструкцию", означает, что нужно подождать пока файл загрузится и можно будет его читать онлайн. Некоторые инструкции очень большие и время их появления зависит от вашей скорости интернета.
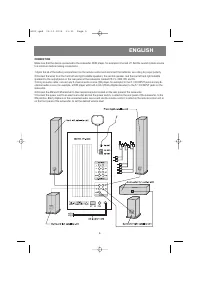


SYSTEM OPERATION
A. TURNING THE POWER ON / OFF
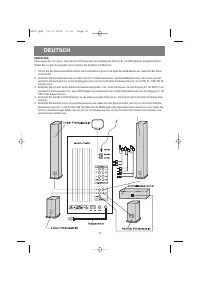
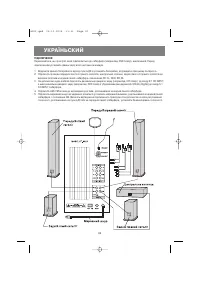
1. Make all the necessary connections in accordance with
the setup instructions before turning on the device.
2. Connect the system’s power cord to an electrical outlet.
(ATTENTION: The power source should conform to the
device’s power supply requirements).
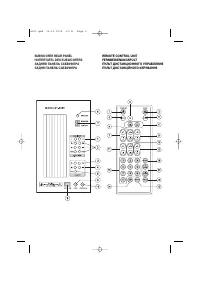
3. Set the power switch, located on the rear panel of the
device, to the ON position. Press the STANDBY button,
located on the remote control unit or on the front panel
of the device, to turn on the device’s power.
B. VOLUME
1. Press the VOL + button on the remote control unit to
increase the overall system volume; the display on the
front panel will show the overall volume level of the sys-
tem in a numerical format.
2. Press the VOL – button on the remote control unit to
decrease the overall system volume; the display on the
front panel will show the overall volume level of the sys-
tem in a numerical format.
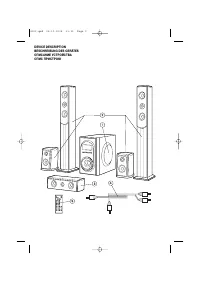
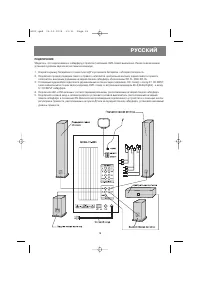
C. 3D SOUND MODE
1. Connect the center and rear speakers to the system.
2. Press the 3D button located on the remote control unit to
turn the 3D sound on or off.
D. CENTER SPEAKER
1. Press the CEN + button on the remote control unit to
increase the volume level on the central speaker; the dis-
play on the front panel will show the volume level of the
central speaker in a numerical format.
2. Press the CEN – button on the remote control unit to
decrease the volume level on the central speaker; the
display on the front panel will show the volume level of
the central speakers in a numerical format.
E. REAR SPEAKERS
1. Press the REAR + button on the remote control unit to
increase the volume level on the rear speakers; the dis-
play on the front panel will show the volume level of the
rear speakers in a numerical format.
2. Press the REAR – button on the remote control unit to
decrease the volume level on the rear speakers; the dis-
play on the front panel will show the volume level of the
rear speakers in a numerical format.
F. FRONT SPEAKERS
1. Press the FRONT + button on the remote control unit to
increase the volume level on the front speakers; the dis-
play on the front panel will show the volume level of the
front speakers in a numerical format.
2. Press the FRONT – button on the remote control unit to
decrease the volume level on the front speakers; the dis-
play on the front panel will show the volume level of the
front speakers in a numerical format.
G. AUDIO SOURCE SELECTION - 2.1 CH or 5.1 CH
1. Connect the system correctly to the audio source.
2. Press the CD/DVD button on the remote control unit or
on the front panel of the subwoofer to select the audio
source (2.1 CH or 5.1 CH).
H. MUTE FUNCTION
1. Press the MUTE button on the front panel or on the
remote control unit to turn off the sound.
2. The MUTE indicator will appear on the front of the sub-
woofer.
3. Press the MUTE button again to turn on the sound.
I. AM/FM
TUNER
Connect the AM and FM antennas to their respective
jacks located on the rear panel of the subwoofer.
1. Press the INPUT button on the remote control unit or on
the front panel until the subwoofer’s display shows the
“TUNE” indicator.
3. Use the FM/AM button located on the remote control unit
to choose the desired band (FM or AM).
4. Press the SCAN button on the remote control unit to acti-
vate the automatic tuning function. The tuner will tune to
a radio station automatically.
5. Press the TUNE+ or TUNE- button on the remote control
unit to tune to a radio station manually.
6. Press the ST/MN button on the remote control unit while
in the FM band to choose between stereo and mono
modes.
7. To save a chosen radio station into memory, press the
MEMORY button on the remote control unit and then
press the desired memory location number on the
numeric keypad and the station will be saved into memo-
ry. To enter a number of ten or higher, first press the 10+
button and then a numeric button from 0-9.
NOTE: You can save up to 20 radio stations into memory.
RESOLVING MALFUNCTIONS
1. THERE IS NO SOUND AT ALL
(1) Make sure the system is connected properly.
(2) Increase the volume.
(3) Make sure the audio input is selected properly.
(4) Make sure the MUTE function has not been activated.
2. NO SOUND IS COMING FROM THE FRONT-LEFT SPEAKER
(1) Make sure the front-left speaker is properly connected to
the device.
(2) Make sure the device is properly connected to the audio
source.
ENGLISH
6
4026.qxd 04.10.2005 11:31 Page 6


