Акустика Sven MS-309 - инструкция пользователя по применению, эксплуатации и установке на русском языке. Мы надеемся, она поможет вам решить возникшие у вас вопросы при эксплуатации техники.
Если остались вопросы, задайте их в комментариях после инструкции.
"Загружаем инструкцию", означает, что нужно подождать пока файл загрузится и можно будет его читать онлайн. Некоторые инструкции очень большие и время их появления зависит от вашей скорости интернета.


ENG
17
Operation Manual
MS-309
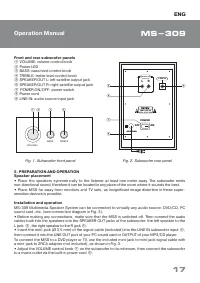
LINE IN
ON
OFF
POWER
SPEAKER OUT
L
R
-VOLUME+
BASS TREBLE
b
c
d
a
e
i
f
g
h
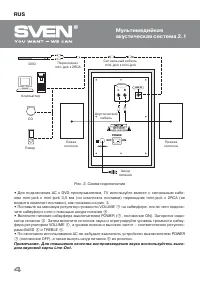
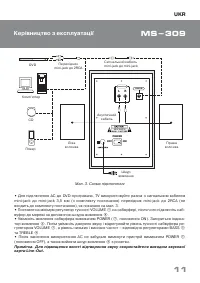
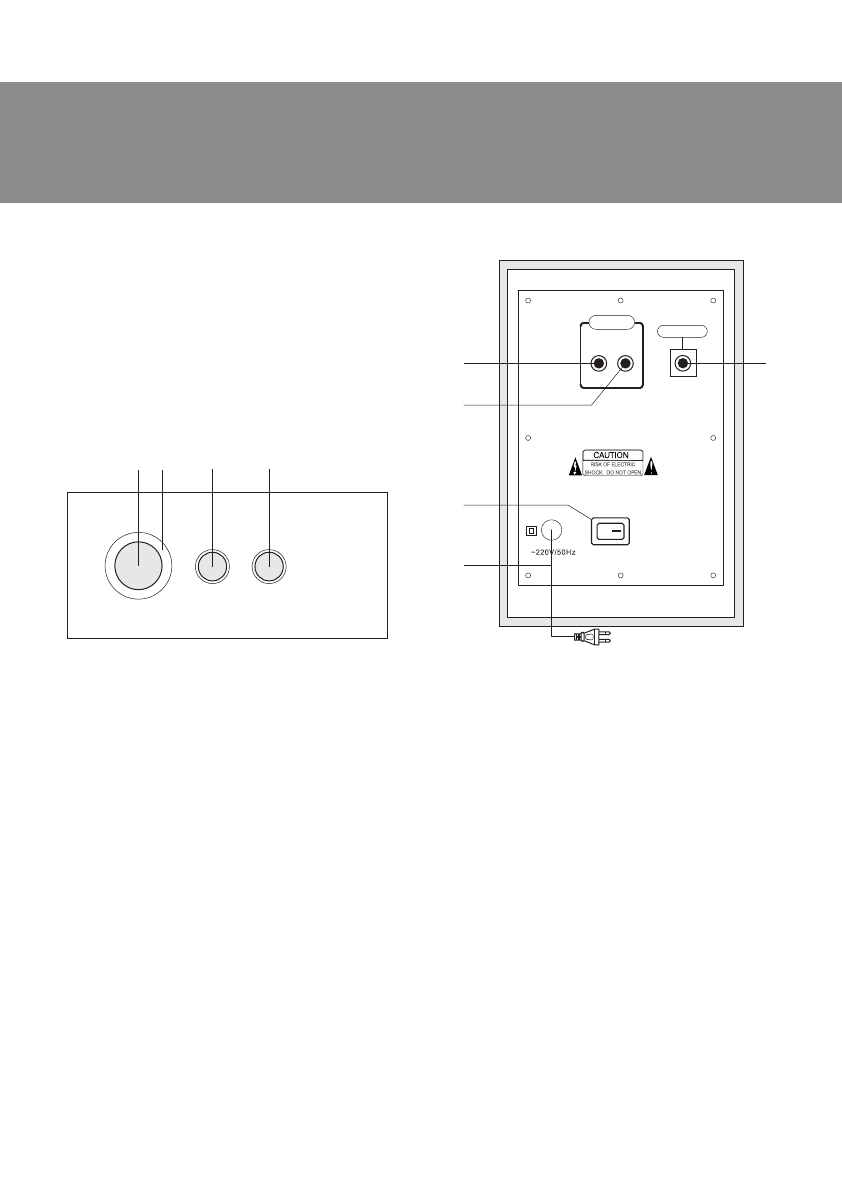
Fig. 1. Subwoofer front panel
Fig. 2. Subwoofer rear panel
Front and rear subwoofer panels
a
VOLUME: volume control knob
b
Power LED
c
BASS: bass level control knob
d
TREBLE: treble level control knob
e
SPEAKER OUT L: left satellite output jack
f
SPEAKER OUT R: right satellite output jack
g
POWER ON/OFF: power switch
h
Power cord
i
LINE IN: audio source input jack
5. PREPARATION AND OPERATION
Speaker placement
•
Place the speakers symmetrically to the listener at least one meter away. The subwoofer emits
non-directional sound, therefore it can be located in any place of the room where it sounds the best.
•
Place MSS far away from monitors and TV sets, as insigni
fi
cant image distortion in these super-
sensitive devices is possible.
Installation and operation
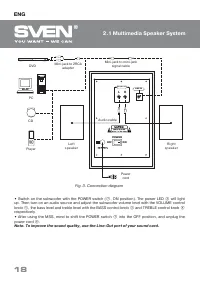
MS-309 Multimedia Speaker System can be connected to virtually any audio source: DVD/CD, PC
sound card, etc. (see connection diagram in Fig. 3).
•
Before making any connections, make sure that the MSS is switched o
ff
. Then connect the audio
cables built into the speakers into the SPEAKER OUT jacks of the subwoofer: the left speaker to the
L jack
e
, the right speaker to the R jack
f
.
•
Insert the mini-jack (Ø 3.5 mm) of the signal cable (included) into the LINE IN subwoofer input
i
,
then connect it into the LINE OUT port of your PC sound card or OUTPUT of your
МР
3/CD player.
To connect the MSS to a DVD player or TV, use the included mini-jack to mini-jack signal cable with
a mini-jack to 2RCA adapter (not included), as shown in Fig. 3.
•
Adjust the VOLUME control knob
a
on the subwoofer to its minimum, then connect the subwoofer
to a mains outlet via the built-in power cord
h
.


