Акустика Sven HT-202 - инструкция пользователя по применению, эксплуатации и установке на русском языке. Мы надеемся, она поможет вам решить возникшие у вас вопросы при эксплуатации техники.
Если остались вопросы, задайте их в комментариях после инструкции.
"Загружаем инструкцию", означает, что нужно подождать пока файл загрузится и можно будет его читать онлайн. Некоторые инструкции очень большие и время их появления зависит от вашей скорости интернета.


5.1 Active Home Theater
Speaker System with Bluetooth
ENG
28
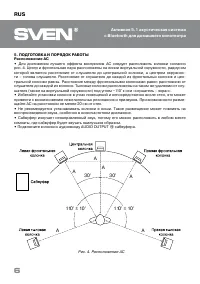
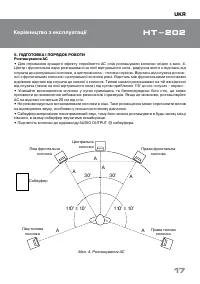
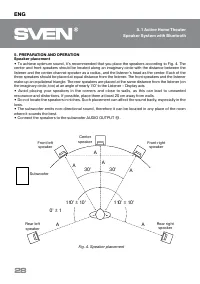
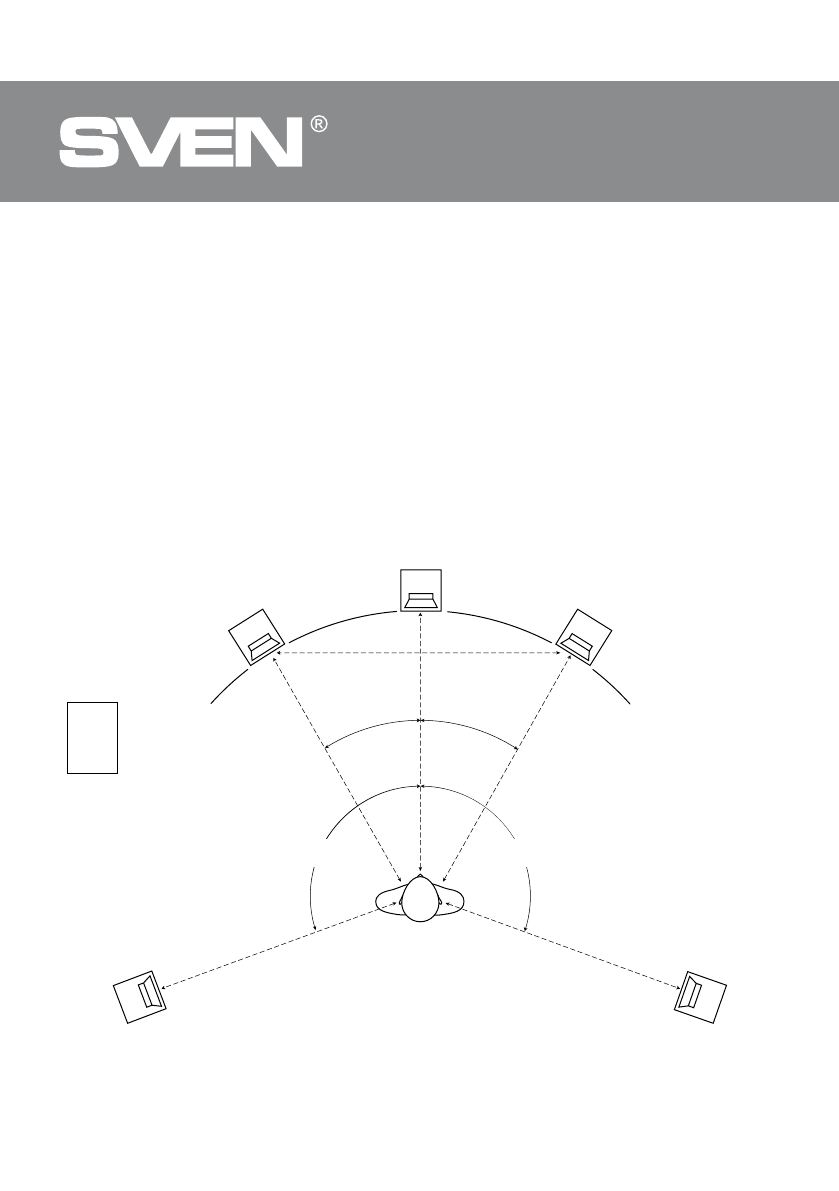
5. PREPARATION AND OPERATION
Speaker placement
•
To achieve optimum sound, it’s recommended that you place the speakers according to Fig. 4. The
center and front speakers should be located along an imaginary circle with the distance between the
listener and the center channel speaker as a radius, and the listener’s head as the center. Each of the
three speakers should be placed at equal distance from the listener. The front speakers and the listener
make up an equilateral triangle. The rear speakers are placed at the same distance from the listener (on
the imaginary circle, too) at an angle of nearly 110° to the Listener – Display axis.
•
Avoid placing your speakers in the corners and close to walls, as this can lead to unwanted
resonance and distortions. If possible, place them at least 20 cm away from walls.
•
Do not locate the speakers in niches. Such placement can affect the sound badly, especially in the
lows.
•
The subwoofer emits non-directional sound, therefore it can be located in any place of the room
where it sounds the best.
•
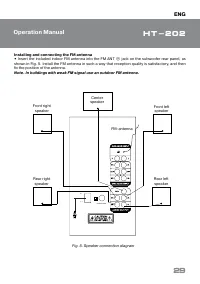
Connect the speakers to the subwoofer AUDIO OUTPUT
l
.
Fig. 4. Speaker placement
A
A
A
A
A
A
30°
30°
11
0° ± 10°
11
0° ± 10°
Rear left
speaker
Subwoofer
Front left
speaker
Center
speaker
Front right
speaker
Rear right
speaker
0° ± 1
Содержание
- 3 Руководство по эксплуатации; Внимание! Внутри корпуса на элементах без изоляции; ТЕХНИЧЕСКОЕ ОПИСАНИЕ
- 4 Панели управления сабвуфера; сабвуфера
- 5 Установка батареек в пульт ДУ
- 6 ПОДГОТОВКА И ПОРЯДОК РАБОТЫ; Расположение АС
- 7 Установка и подключение FM-антенны; Вставьте входящую в комплект комнатную FM-антенну в гнездо FM ANT
- 8 Подготовка к работе; Подключите шнур питания
- 9 Выбор источников сигнала
- 10 Режим Bluetooth; , положение OFF) и выньте вилку сетевого шнура
- 11 УСТРАНЕНИЕ НЕИСПРАВНОCТЕЙ
- 12 ТЕХНИЧЕСКИЕ ХАРАКТЕРИСТИКИ; жить основанием для претензий.


